Click&Clean
 will help you to automatically delete your browsing history, download history, typed URLs, cache, cookies and another private data. Below we offer few important and easy steps to be taken to get started.
Highly recommended!
After Installing
Once Click&Clean is freshly installed or updated from a version before 8.x, you need open the Cleaner and check your cleaning settings as described below.Open the Click&Clean Settings
Open the Click&Clean drop-down menu by clicking the Click&Clean button
1 at the right of the Chrome toolbar.
In the drop-down menu, click on any button labeled "Options"
2 Please don't click on any button before you have configured the settings to your need.
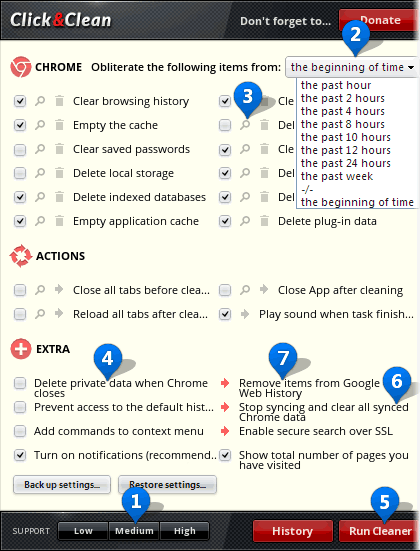
3. When the Options window appears (Pic. 2), carefully check the settings for each item listed.
Configuring the Cleaner Settings
The settings are divided into three sections described below and shown on the Pic.2
You can configure each option either separately or to select one of the three presets which are pre-configured for common usage scenarios:
Low, Medium and High 1 This allows you to easily configure all available settings without having to consider and set each option separately.
The Chrome section, where you can select the time period
2 and what type of data will be deleted every time when you run Cleaner (or automatically, when Chrome closes).
Also, you can view the details
3 of each data type and for example make an exception for cookies that you want to keep.
The Actions section, where you can specify which actions will be performed either before or after the cleaning process. For example, you can choose to automatically close all tabs before cleaning.
The Extra section where you can find advanced features such as
Delete private data when Chrome closes 4 ; Prevent access to the default History page; Play sound when task finished; Backup and Restore Cleaner settings.
After you've specified the settings, just click the "Run Cleaner" button
5 to start cleaning.
Cleaning
After tweaking the settings, you can start the cleaning process either by clicking the "Run Cleaner" button
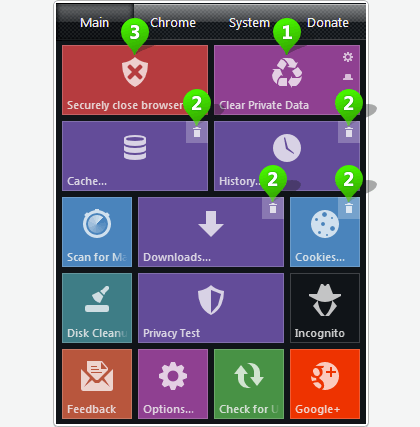
5 or by clicking the "Clear Private Data" button
1 located in the Click&Clean menu.
This will erase any browsing data according to the settings you've specified.
Also, you can quickly erase only certain browsing data such as Browsing History, Download History, Cookies and Cache
2 Additionally, you can automatically delete all your private data when Chrome closes
4 This erases your private data (according to your settings) every time you close Chrome, without any prompts. However, in some cases, it is not possible to delete all data when Chrome closes. In this case, the Click&Clean automatically deletes your browsing data when you start Chrome next time. To avoid this happening, we recommend you to use the
"Securely close Browser" 3 button. Just 1-click to close Chrome and automatically erase all your browsing data.
On completion of the cleaning process, you can verify that your browsing data was successfully deleted. Open the Click&Clean menu and click the "History" or "Cache" button to view details.
Note: If you use
Chrome Sync and/or
Web History to automatically sync and save your browsing history, open tabs, passwords, saved Autofill form data etc. into your Google Account, you can erase all saved data by using the options
6 and
7 shown in the Pic.2
Hope this guide will help you to use Click&Clean efficiently and will increase your level of personal safety.